| Section Page | Previous Page | Next Page |
N gauge van conversionsby Les Stone IntroductionThe Great Western Railway had a vast wagon fleet; the majority were to standardised designs from the drawing office at Swindon. The exceptions, of course, were the numerous examples from the absorbed companies after the Grouping in 1923. I am concentrating on the covered vans, also known as Minks, Mogos and Fruit- and Fish Vans in Great Western speak, for this article.
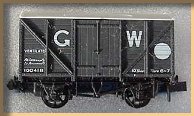
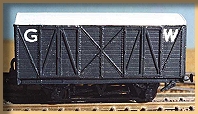
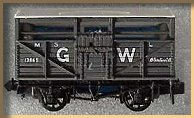
In 'N' Gauge we are quite lucky in having the ready to run Mink from Peco (refs NR43W, NR43M, NR43E, NR43B, NRP130 and KNR43). The N Gauge Society has also produced a kit of a Mink 'C', and it is with these kits that other variants of Minks can be made. I am also using parts from the Peco Cattle van (refs NR45W, NR45S, NR45M and KNR45) to increase the range of vans available. There is also the GWR Fruit 'D' from P&D Marsh, but that is a very expensive way to change your model fleet so I haven't included any conversions using parts from that kit.
By using a permutation of the ends and the sides available from these wagons, it is possible to produce a much larger range of Minks, Fruit Vans, Fish Vans and if you are modelling the right period, a meat van. I hope that you appreciate that the models resulting from this Mix'N'Match exercise aren't 100% accurate, but if we accept the coupling we use then a slight discrepancy should be tolerated.
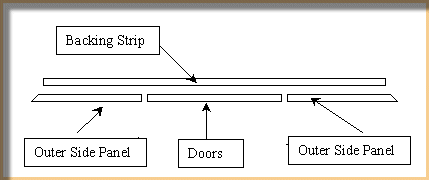
By the end of these pages, if you've done each example, you will have several different vans not available anywhere but our own modelling studios. Some of the conversions are quite easy and straightforward but some are more difficult. To do all of the conversions shown in this article require many donor vans, but some may be built using the parts removed and left over to do another conversion. The following pages include tables showing the details for each diagram of van and will also serve as a ready reckoner for a shopping list for parts. The main features to keep in mind are the end- and door- styles, and the van length. Ends There are two ends available to us for possible conversion use and they are: The Peco Mink end with twin bonnets and low type diagonal bracing, and the Peco Cattle van, which has no vents or shutters and has the high type diagonal bracing. The end from the Peco Mink is suitable for the following diagrams: V14, V16, V18, V21, V23, V24, V26, V27, V28, V33, V34, and V36. The end from the Peco Cattle van is suitable for the diagrams S2 (ex V13 Fish van), S6 and S12 (Larger Fish vans). Doors The Peco Mink has the later type of vertically planked doors. These were mostly fitted to the vans with 17' 6" bodies (the Shock absorbing vans are the exception) and some of the larger Minks, Fruit and Fish vans. The N Gauge Society Mink 'C' has the earlier and narrower outside framed doors, suitable for use on the majority of the 16' bodied vans and also some Fruit and Fish vans. Chassis To start with I used the standard Peco 10' wheel-base chassis, but as my experience grew I also used the Peco 9' wheel-base chassis where it was appropriate. There isn't actually that much of a difference in N, and certainly I haven't come across anyone who has said that X wagon should have a 9' chassis when I have put a 10' one under it. [The Peco 9' and 10' wheelbase chassis are available as kits, or ready-made under the RTR wagons. Both can be fairly easily shortened or lenghtened, Ed]. For the larger mink conversions I used the Parkside Dundas 12' wheelbase chassis that comes with the N Gauge Society's Mink 'C' kit. Shortening the Peco RTR Mink The Peco RTR Mink portrays the later 17'6" vans. To build any of the older (16' body) vans with the outside framed doors, the Peco body will have to be reduced in length by 3mm in our scale. This can be done when the doors, which come with the Peco van, are carefully removed and replaced with a pair of doors from the Society's Mink 'C' kit [which are narrower, Ed]. This operation sounds quite simple but is a bit more detailed than first thought. The Peco van must be cut into a kit of parts similar to the way that the Society's Mink 'C' is laid out, and should consist of two end panels and two side panels. I found that the easiest way was to completely remove the inside floor of the Peco van and cut through the corner posts at 45° with a narrow razor saw. The only snag is that a junior hacksaw blade is too thick, so if a razor saw isn't available then several light passes carefully with a scalpel is the only way to separate the van into the required parts.
MinksThe following Minks can be made from the conversions described below:
V14, V16 and V18
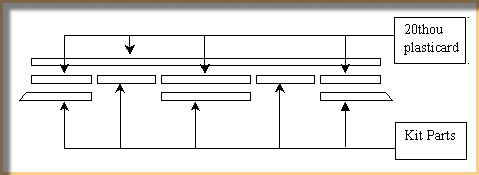
So, we will need for a Diagram V14 Mink the following:
The hardest thing to do is getting the body the same length as the chassis, so don't stick the panels to the backing strip until the total length of all parts together is satisfactory. You will have to do this by removing small amounts from the doorposts and doors until a satisfactory fit is obtained. V21 and V33 The V21 and V33 diagrams were built in 1927 and 1929 respectively and had had the longer 17' 6" body but still mounted on a 9' chassis. The earlier V21 was vacuum fitted and was the first diagram of Minks to receive the vertically planked doors as modelled in the Peco van. There is not much to do with this variant, as the body is OK straight from the box. All you have to do is increase the length of the shorter chassis to fit the longer body. By inserting a strip of plasticard across the ends where the Buffer beam should be and profiling the ends of the strips to match the solebar channel section, you should solve that little problem quickly. The Buffer beams are then cemented straight onto the plasticard strips to complete our longer 9' chassis. V23, V24, V26 and V34 The Peco Van straight from the box is suitable for diagrams V24 and V34, and when you add the proper vacuum brake gear, i.e. Cylinders, hoses and axlebox tie rods, will become diagrams V23 and V26. V27 and V28 The V27 (there was only one built, as a prototype) and V28 diagrams were Shock Absorbing vans and were fitted with the 16' body on the 10' chassis. The ends were slightly short of the buffer beam at each end, this allowed the body to move on impact during shunting or transit. Also there was a large spring either side of the van which were set in the channel of the solebar and reduced the crashes and bumps experienced during daily life of the van by allowing the body to slide on the chassis when stopping or starting, ideal for fragile loads.
The most difficult part of this diagram of van is that the doors were the newer planked type so must be filed slightly at the doorposts and cornerposts to shorten the body to the required 16ft. Once the body is shorter than the chassis and shows a lip at each end, there shouldn't be any need (unless you are a rivet counter) to remove more than is necessary. V36 The V36 diagram was built with Plywood sides and ends during the Second World War in 1944, and is a lot more difficult to build than might seem. Basically they were the same as the Peco Mink but the sides were smooth, no planks at all. To model a van of this diagram, the plank marks in a Peco Mink must be filled with Milliput or something similar and sanded until smooth. It sounds quite straight forward but it is in fact very intricate work, and I wish any of you who are going to try one of these the best of luck.
Fish, Fruit and Mogo VansThe following Mogos and short wheelbase Fish- and Fruit vans can be made from the conversions described below.
S2 Fish Van
Y4 Fruit Van
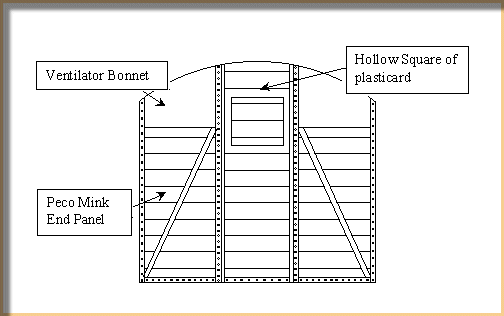
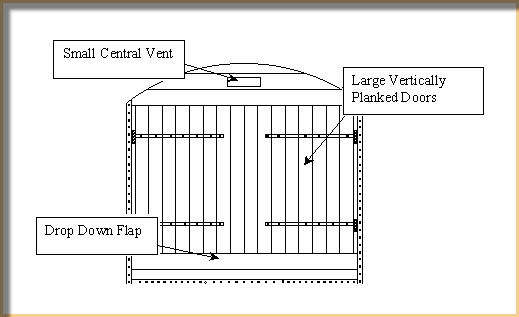
Y12 Fruit Van This diagram of Fruit Van is harder to do than the previous Y4 variant, but is only slightly different in it's construction. The only difference is that the twin bonnet type ventilators of the Peco Mink end- panel are removed carefully, and the planks scribed in their place. Once again there is the central louvred panel fitted, easily done, with the hollow square of 5 or 10 thou plasticard. G31 Mogo Car Van
To do this, it is necessary to completely clean the end panel, of all details, with a file and some wet & dry paper. You next make the end-doors from 10thou-scribed plasticard and cement them on carefully. There should be a double plank drop down flap underneath the large doors and a small triangular fillet of plastic for the vent above. The drawing shows what is needed for the ends and how the scribing of the planks should look. These vans were identical to the G31s except that the sides were constructed from Plywood; the ends were the same as the G31s in that they were planked, so the same method applies here as with the V36 diagram Minks.
Large vansThe following Large Mink, Fish and Fruit Vans can be made from the conversions described below:
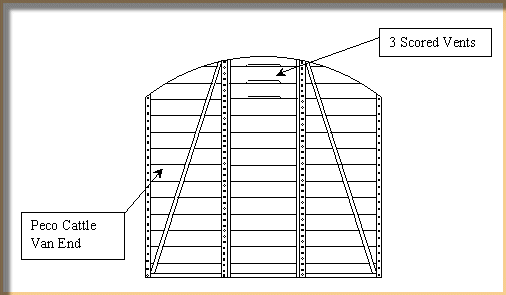
Modernised V7 The N Gauge Society Mink 'C' is a diagram V7. A slight alteration by using the ends from a Peco Mink (with the twin bonnet type vents) will make one of the later types of V7 after a visit to works. I don't think it is necessary for me to detail the blow by blow accounts for this van. One point to note: This and other Vacuum fitted vans had a tie-bar between the bottom of the W-irons (the W shaped plate-work that the axleboxes are mounted in) to help stiffen the chassis during braking. S6 Fish Van
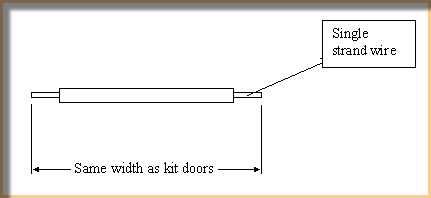
S12 Fish Van The S12 type Fish van, again, needs Peco Cattle van ends but the Society Mink 'C' sides are perfect as they are, and this is probably the simplest Fish Van conversion to do. The roof also requires six shell type ventilators to top it off. Y9 Fruit Van The Y9 Fruit Van was also known as a Fruit 'C'. It requires vertically planked doors from the Peco Mink to be fitted to the sides of a Mink C kit. The sides must remain the same length as an ordinary Mink C. The doors, doorposts and the mitred ends must be filed gently to make them fit the standard 12' chassis as used with the Mink 'C'. The end panels are from a Peco cattle van, and for this model a total of eight shell vents are needed. Also, to finish the model off, there were two oil lamps fitted in the centre of the roof in line with the doors and short stubs of sprue (the plastic rodding that all of the kit's parts are joined to) will portray these quite well. |
| Section Page | Previous Page | Next Page |