Detailing the Triang Dean Single
by Mikkel Kjartan
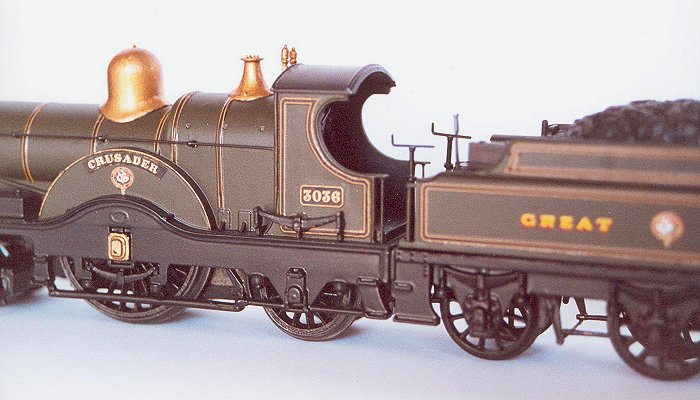
Detailed Triang 3031 Class Dean Single
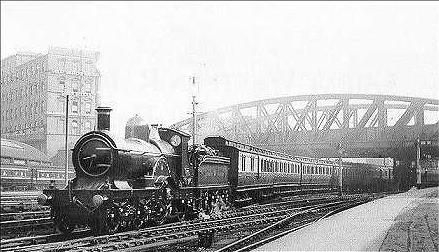
| The Dean 3031 Achilles Class Singles were magnificent examples of Victorian locomotive design. We don't see many Victorian locos in RTR form, so the old Triang/Triang-Hornby OO version of this class is fairly unusual in that respect. Unfortunately, the model has never been upgraded, and therefore looks rather toylike by todays standards: there are no separate handrails, the lining is strangely moulded-in, and the tender and bogie leave much to be desired. |
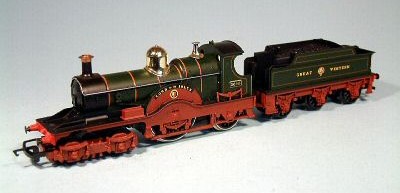
The original Triang version |
However, I was short of funds and didn't yet have the skills to go for a kit-built version, so I decided to have a go at detailing the old Tri-ang stager.
Items used
- Triang Hornby Dean Single ref R354
- 3000 gallon tender top from the Dapol/Hornby Dean Goods
- Alan Gibson dome & safety valve, as used on his own white metal Dean Single kit
- Alan Gibson brake shoes, brake rodding, handrails and smokebox door dart
- Alan Gibson 14mm Plain Rim bogie wheels
- Bill Bedford name- and numberplates
The Triang-Hornby loco is relatively easy to obtain second-hand if you are prepared to call around to the various dealers, attend swap-meets or lurk in the shadows of eBay. Note, however, that some versions of the model came as part of a full set including coaches. This set is by now a collectors item.
The loco I acquired was in fact a reasonable runner, and is fine for pulling a short rake of clerestory coaches from one end of a layout to another. That said, this is not exactly state-of-the-art technology, and care should be taken to avoid examples that have lost the magnetized effect in the wheels, as this will greatly reduce the tractive capabilities.
The tender top was purchased directly from Dapol, but should also be obtainable second-hand or possibly from the Hornby spares dealers. It is quite good and replaces the coarse example supplied with the Tri-ang loco. The chassis of the Tri-ang tender was retained for want of something better, but fortunately the Gibson brake gear enhances it considerably. The plates were made quite cheaply by Bill Bedford.
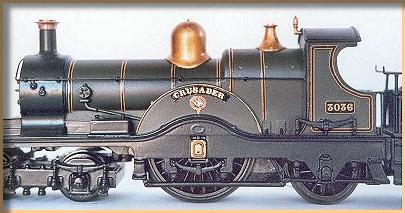
Side-view of detailed loco. For now, the bogie remains an eyesore.
Main steps
- Removal of the moulded-on handrails
A slightly tricky job. I first divided the hand rails into small sections by making small cuts across the mould. The handrail was then removed bit by bit with a small, sharpened screw-driver – always good for removing details from plactic bodies.
- Filling up the lining grooves on the cabsides
This was done with Miliput epoxy putty, after removing the cabside springs. The cabside was subsequently smoothed over with wet and dry paper.
- Improvements below the footplate
The underhung springs and brake gear can be much enhanced by carefully cutting away the 'backing plastic' which strenghtens the springs and brake rods on the loco. Slimming down the brake rods and adding brakeshoes to the rear wheels also helps. The original model has a slice cut out of the front part of the footplate, in order to let the bogie clear train-set radius curves. Covering this with cut-to-shape Plastikard adds another obvious improvement to the lower regions.
- Adding new handrails
Holes for the handrail stanchions were drilled with a small hand-drill, and the stanchions then fitted with superglue. Adding handrails is always a fiddly job, and describing it is worse. I find the best approach is to work 'from the middle outwards'. I first bend the handrail around a piece of pipe, and tweak it to fit the curved outline of the smokebor door. Following this, the handrail wire is bent at an angle to make it follow the boiler. Only then is it fitted in the stanchions, starting from the smokebox end and fitting the rail on both sides of the boiler simultaneously.
- Adding further fittings
Vertical handrails were also added to the cab, and the dome and safety valve were then fitted to the boiler. The latter are not a perfect fit, but this can be improved by rolling a round object against the shoulder of the dome/safety valve until the shape is right.
- Re-wheeling the bogie
The bogie is where the biggest compromise lies. I experimented with various ways of improving and even replacing the bogie, but was unable to find a solution that did not impair running considerably. I therefore turned a blind eye on the bogie and have done so ever since. I did however add a pair of Gibson bogie wheels. These are rather inappropriate but well concealed by the bogie frame.
- Assembling the tender
I cut and filed the top of the original tender chassis to make a smooth horizontal surface for the new tender top to sit on, and then added the brake gear. This comes as plastic brake shoes and straight brass rods, and was assembled with superglue. Finally, I shortened the gap between tender and loco by using Plastikard to pack up the space where the drawbar hooks to the tender.
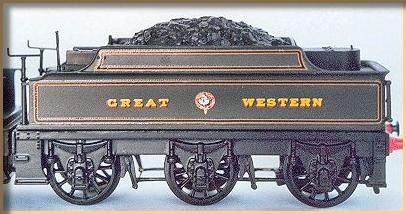
The modified tender: Detailed Triang chassis and Dapol body
Livery details
I chose the 1906–1914 livery with black frames and garter crest on the splashers. The model carries a round-topped firebox, whereas most members of the class had the flat-topped Belpaire boiler by this time. However, photographic evidence indicates that one or two locos did run with this combination of livery and firebox in the late Edwardian period. That said, Indian Red frames wouldn't have looked bad either!
Paints and transfers for the period are widely available from the trade. That said, painting is not my favourite pastime, so Chris Phillips kindly did the job for me – providing a quality finish as always.
|