Star from Airfix Castle
by Mikkel Kjartan
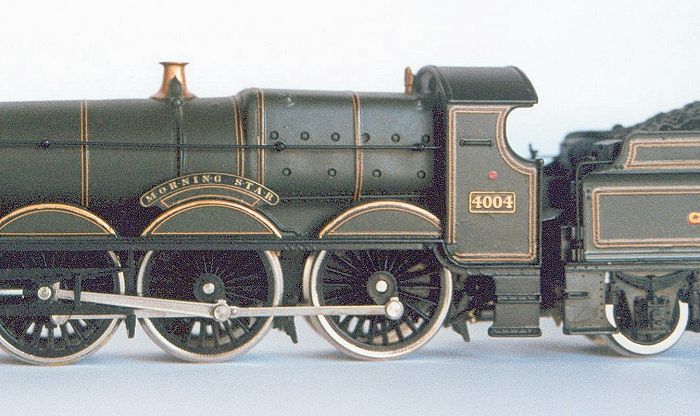
4004 "Morning Star" converted from an old Airfix Castle
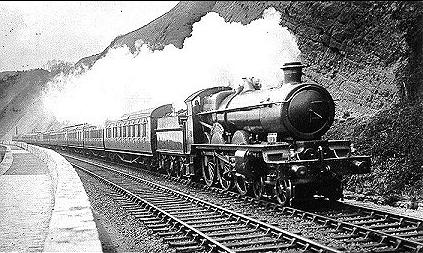
The Churchward Stars were among the most important and innovative designs in the history of British steam. The more widely known Castles and Kings that followed later were in many respects just modernisations and improvements of this superb 4-6-0 design.
Until the recent (2013) Hornby Star loco, there has been no RTR model of the class available, but if you are prepared for a bit of ruthless hacking about, a decent representation can be arrived at without too much trouble. That said, this project does require a longer shopping list and a little more patience than most of the other RTR modifications described on this site. However, I have always wanted a Star, and found it a worthwhile project to spend time on.
Hornby Cab, Airfix Body, Gibson fittings, CGW plates
Items used
- Airfix Castle class loco (less tender)
- Hornby County class body and tender
- Sprung Hornby drawbar
- Alan Gibson Star class chimney and tall safety valve cover
- Alan Gibson door darts and Churchward-style buffers
- Dapol fall plate
- CGW name and number plates
- Bits of Slaters Plastikard and plastic rodding
The Airfix Castle should be easy to pick up second-hand, and does not even need a working tender. Since the real Castles were very much based on the Stars, the wheelbase and footplate dimensions are virtually identical. The main compromise in using the Castle body is the different pitch of the boiler on the two classes. This is slightly lower on the Star, but is not in my eyes sufficiently noticeable to discard the otherwise very suitable Castle body.
Having accepted the Castle boiler, it would be tempting to use the improved Dapol/Hornby version of this model instead, since this has the motor located in the loco itself. However, this version has additional casing on the lefthand side of the body, which is inappropriate for the Stars and would require quite substantial modification in a very visible location.
The Hornby County components are available separately from most of the dealers specialized in Hornby spares. This includes the tender, which is available fully finished in ready to run condition. Alternatively, the County has been produced in so many versions that second-hand items are easily found.
Note that the fittings used here reflect the particular condition in which I wanted to model the loco. The Stars were modified in a number of areas during their lifetime, including features such as the type of safety valve cover and the fitting of topfeed and ejectors. The condition of the loco is therefore important to define beforehand.
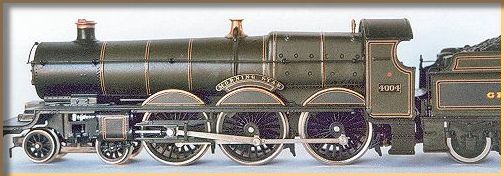
Full broadside view, showing the County tender
Main steps
- Prepairing the Castle body
Having separated the Castle chassis and body, I removed the outside steam pipes at the front end of the boiler. I believe some Stars were fitted with these in latter years, but I wanted an earlier version. Next, the Castle cab was removed. Fortunately, this lifts off easily, leaving behind a groove on the rear section of the firebox in which is has been fitted. I carefully sawed away this groove with a small hacksaw and kept going until the backhead and cab floor fell away. This left a fairly clean cut which was filed and sanded in readiness for the new cab. Finally, I cut away the vertical housing on the right hand side of the firebox. This was never to my knowledge fitted on the Stars. The resulting hole was patched up with Plastikard and any gaps filled with Miliput.
- Preparing and fitting the County cab
The County cab was separated from the body by sawing down through the firebox with the hacksaw, just in front of the cab. This sounds worse than it is: The spectacles on the cab come off and can thus be removed to avoid damage. Moreover, by sawing 1 to 2 mm away from the cab I reduced the risk of damaging the cab with the saw. The remaining milimeters were removed afterwards with a sharp scalpel. Following this, the steps were removed and the cab sides then carefully cut back from the rear by 4mms. This is important to get right, as the length of cab sides is a distinctive feature of the different GWR classes. The cab was then joined to its new body with superglue. Minor gaps in the footplate were filled, and the steps refitted. The original Castle backhead was slightly trimmed and then remounted in the new cab.
- Replacing the boiler fittings
The saftey valve cover on the Castle body is the wrong type in the wrong place. I can relate to that, but the problem does need to be addressed since this is a fairly apparant difference between the Castles and Stars. I cut away the original saftey valve cover and carefully removed the topfeed using a scalpel, a sharpened screwdriver and wet and dry paper in combination. The new Gibson saftey valve cover was then fitted in the correct position, i.e. further back, on the second ring from the firebox. Feed pipes were simulated with thin layout wire, superglued onto the boiler and joined to the saftey valve cover by moulding a small blob of Miliput to the correct shape. Once painted, this arrangement is quite convincing. The original Castle chimney was then cut and filed away, and the replacement chimney fitted instead.
- Joining the loco and tender
This is fairly straightforward work. The tender was left virtually unmodified, and was joined to the Star through the standard Hornby sprung drawbar. The drawbar is fixed to the loco though the large locating screw which holds the loco body and chassis together. This screw also holds the loop end of the original Airfix wiring for the loco wheels, thereby conducting power through to the motor in the Hornby tender. This sounds far more complex than it is, and seems to work faultlessly.
- Final detailing
The original Castle model has ejectors fitted, and these are also appropriate to the Stars in the condition I was modelling. There are some differences in terms of shape, however, so I cut off the cab-end of the ejector pipes and fitted an adapted piece of plactic rodding instead. This was shaped by studying protoype photos. Other detailing included new wire grab handles for the tender, door darts for the smokebox, a Dapol fallplate and more correct pattern buffers.
The loco is painted and lined by Chris Phillips in the 1906–1914 livery, and fitted with the excellent name- and number plates from CGW. The wheels are rather shiny and do need blackening or painting. I'll get around to it. Eventually.
Some notes on prototype variations in the Star class can be found here.
|