Dean Sidings Barry Railway Class L
by Graeme Pettit
The kit
This body kit is from the small range of 4mm resin body kits available from Dean Sidings.
The kit represents the Barry Railway 0-6-4T locos to Class L. There are two versions of the kit – one for the original domed Barry railway version, and one depicting the post-grouping version after rebuilding by the GWR (I built the GWR version).
The class had, to the best of my knowledge, all been scrapped by 1930.
The kit is supplied as a basic resin cast body with a bag of whitemetal fittings, and is intended to fit the current Hornby 0-6-0T chassis.
It is sold with the intent that you can make up a passable model of an unusual prototype very easily and quickly, and in that it fulfills its intent admirably, and comes well recommended by me.
The few whitemetal castings supplied were totally free from flash, and just needed slight touch up work to make perfect – a very nice job Mr Caster. |
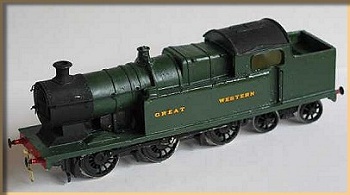
The Barry Class L nearing completion. This is the post-grouping, "Swindonised" version of the kit.
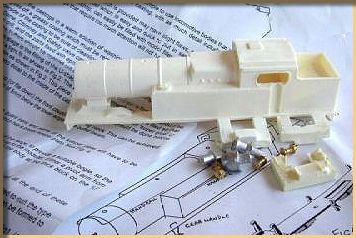
The main kit components and instructions. The kit shown here is the original, Barry Railway version of the class. Photo courtesy Jenny Langdon.
|
Shopping list
It is left to the buyer to add any details to the kit which he wishes. So far, I have gone part way, and added handrails and smokebox door dart from Gibson, and a set of etched couplings. The extra parts required to bring the loco up to scratch will include:
- Handrail wire and knobs
- Smokebox door dart(I used Gibson)
- Footsteps (I suggest you contact someone like SE Finecast or make them up yourself)
- Cab steps
- Bogie Wheels
- Lamp Irons (I make mine from folded staples – they are flat, stiff, and cheap)
- Lamps – and, if you use an older chassis, Brakes (I used Springside)
- Couplings (Have fun if you try to fit the Hornby type – why not change to scale?)
- Paint and Lettering (Mine is HMRS)
- Numberplate (I'm still looking, but I have made a passable representation on the PC)
- Pipework
- Buffers are provided, but could be better!
The bogie
The biggest woe I have had with this kit concerns the trailing bogie. I had loads of problems trying to get it right, and get it to stay on the track – I eventually solved them by the complete removal of the locating block under the cab, and manufacturing one to match the profile shown in prototype photos.
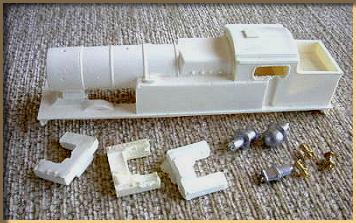
A closer look at the components of the original, Barry Railway version of the kit. Photo courtesy Jenny Langdon. |
The bogie mounts on a screw, fitted from underneath. Above the bogie is a governor spring obtained from my local lawnmower repair workshop. This spring is in compression and forces the wheels down on the track.
Once the bogie does what it should, i.e. swing freely, and ride the rails, even over points and around corners – you can look at filling up the obvious air gap above it. I did this by cutting out and fixing two pieces of card on each side beneath the loco body. These where punched from the back with a blunt point to resemble rivet detail, and glued into place under the cab. A distinct improvement, and they hold the main chassis central too. I'm sure that, if you find sufficient photos, you will spot other details.
Conclusion
This body kit is good value as a starting point, but expect it to cost you around £50 plus a chassis to make a good end product worthy of exhibition use. Mine isn't – yet!
For info and references on the Barry Railway, see the GWR Features Section.
|