V5 PBV from Triang clerestory coaches
by Mikkel Kjartan
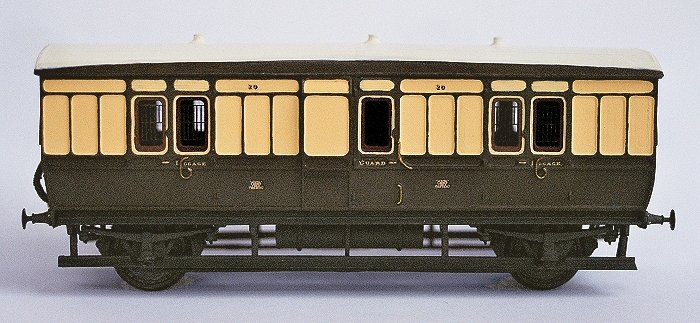
Passenger Brake Van No. 20 to Diagram V5
The GWR 4-wheel Passenger Brake Vans (PBVs) were appealing little vehicles. Although not nearly as common as the compartment brakes, they were no unusual sight on larger branches, and – in the early 1900s – were sometimes also used with rakes of 6-wheel and even bogie stock.
There are currently no 4-wheel PBVs available in pure plastic kit form, but that does not mean the less experienced modeller needs be without one. In particular, the diagram V5 type can be built fairly easily using components from other kits, since this diagram draws heavily on standard measurements employed widely across the GWR 4-wheeler fleet. Indeed, the V5 can be constructed from a number of sources:
- An RTR conversion based on the short Triang clerestory coaches (as described below)
- An all-plastic kit conversion based on the Ratio diagram T59 Brake 3rd
- The Shirescenes combined etched brass and plastic kit (using Ratio parts)
- The etched brass kit from Alan Gibson
The order of the above list also provides a hint on the degree of detail and accuracy obtainable from these four options. Hence the Triang conversion does involve certain compromises, most notably an inaccuracy of about 1.5mm in the height of the coach sides. However, the great attraction of the project lies in the possibility of using the left-over brake ends from the C10 conversion. If that isn't plastic recycling, I don't know what is!
Items used
- 2 Triang Clerestory Brake 3rds (brake ends only)
- Ratio 4-wheeler underframe and roof
- Maunsell wheels, brass bearings and short coach buffers from Alan Gibson
- ABS low roof ventilators
- Slaters Plastikard (sheet)
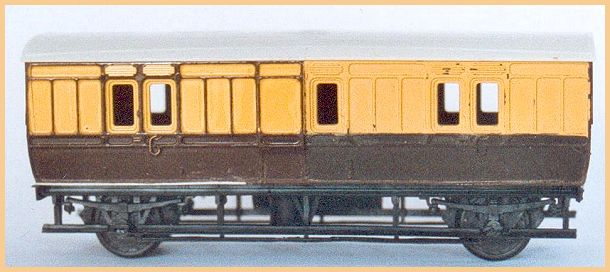
The V5 during construction
Main steps
- Prepairing the main coach body
The two Triang Brake ends were each cut with a razor saw just after the guards lookout, allowing the two ends to be joined as seen in the photo above. As always, I spent much time filing, smoothing and filling out the two halves to ensure a good join. This is essential since joins show surprisingly clearly through subsequent layers of paint if one is not careful.
- Removing the moulded-on solebars
The Triang coaches come with the solebars (i.e. the 'frames' beneath the coach body) moulded on to the main body. It is tempting to retain them as a basis for the Ratio chassis, but measuring indicated that they are slightly (about 1mm) too close together to allow free running of the axles. I therefore decided to saw off the moulded solebars. This is a slightly tricky operation which in my case resulted in some slight damage to the lower part of the body. Note that the buffer-beams also had to be cut off and then refitted to allow this operation.
- Building the Ratio underframe
The Ratio underframe was then built up as per the instructions. Following this, I immediately cut the chassis in half to allow for 'cutting and shutting'. This crude and ruthless operation on your nice new underframe essentially involves shortening the chassis to the correct length by removing a few millimetres from the center of the underframe (diagonally). The exact length to be removed depends on whether one is using the long or short version of the chassis. The two halves of the underframe were then rejoined and reinforced with Plastikard (invisible once fitted to the body). Final chassis details, wheels and buffers were then fitted, and the chassis mounted to the body.
- Roof and interior
The Ratio roof was cut diagonally in two halves and shortened in the same manner as the chassis. The curve of the roof does not exactly fit that of the coach ends, so I carefully bent the roof to shape, and added a small strip of Plastikard to the underside of the roof to further overcome this problem. Inside the coach I added a simple dividing wall made from Plastikard sheet, in order to darken down the interior of the coach (which, I feel, often provides for a more realistic appearance).
The end result is a nice little PBV which, although hardly to the liking of the purists, is a fair representation of a V5 and a pleasing addition to, say, a rake of Ratio 4-wheelers.
|