| Section Page | Previous Page | Next Page |
Parkside Dundas 4mm 'Beetle' cattle vanby Graeme Pettit
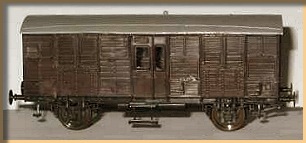
The 'Beetles' were used mainly as vans for shipping prize cattle and other livestock. Some had a central stove fitted compartment so that the handler could escort the stock in 'relative' comfort, and tend to the beasts well-being whenever the train stopped. Each of the two compartments could hold 3 animals. Unlike the passenger rated 'brown' vehicles, the 'Beetle' vans were numbered in the horsebox series. There were some changes in the suffixes of these vehicles over the years, and the 'Beetle' code was never carried on the vans, unlike many other GWR vehicles. I think the GWR society at Didcot has one of these vehicles in preservation, and I'm fairly sure I saw it at the back of the carriage shed in summer 2002. For further details, see "Freight Wagons and Loads in Service on the Great Western Railway and British Rail, Western Region" by J.H Russell, Publishers OPC. Figures 108 and 109 in this book show 'Beetles' to diagrams W14 and W17 respectively (the latter was 6-wheeled). You can also find reference to these diagrams and the diagram W7 in Volume 2 of Great Western Coaches, also by J.H. Russell (Publishers OPC).
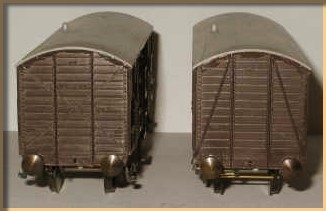
Two Parkside kits cover these vehicles: Kit PC67 which represents the original as built in 1909, and PC64, which represents a further batch built in 1926. The main difference between the two is in the end panel strapping arrangements, and the attendant's compartment door layout. Instructions are the stock Parkside single side of A4, landscape format, and show chassis arrangement, step assembly, sprue part layout, and side drawings for livery details. The instructions are at odds with the drawing regarding the position of the vacuum cylinder, relative to the roof stovepipe, so work from one of the referenced photographs. Note that considerable care needs to be taken with glazing of the two windows, as these are very small. Use glue sparingly! Care must also be taken to orient the doors correctly against the underframe, and to put the roof on with the stovepipe over the compartment bay, not the doors.
Buffers, also, would be better if the correct pattern cast type are fitted. The turned brass are solid enough, but look very wrong. As an aside, footsteps are supplied with the David Geen Y3 Fruit kit, and, if you build the Y3 with long footsteps, you will be left with some nicely moulded whitemetal ones to utilise on this Beetle kit when your plastic ones eventually snap off! The only other problems I think you may run across are with the right hand lower sliding vent cover, which has a label clip attached. Make sure you get it the right way up as the instructions do not make it clear which way up it goes – and with the PC67 kit, the drawing does not show where the door springs fit, but the location is described. Again, work from photographs. The kit will produce the W7 variant, as seen in the diagram below. Note that the end bracing differed between the early and later lots of this diagram, so check photos for the version you need. With a little care and imagination, other 'Beetle' diagrams are possible. For the really adventurous, you could have a go at building the 6-wheeled variant of the beetle. Bodywork hacks would appear initially to be minimal, and with a set of etched W-irons, some axleboxes and a little compensation system, it should be possible using this kit as a basis. The destination clips were on the right on the 6-wheeler, and the brake 'tell-tale' seems to have been omitted also. Otherwise, the bodies are very similar.
|

| Section Page | Previous Page | Next Page |